Pizza oven troubleshooting: a technician's step-by-step fix guide
Pizza oven troubleshooting: a technician’s step-by-step fix guide
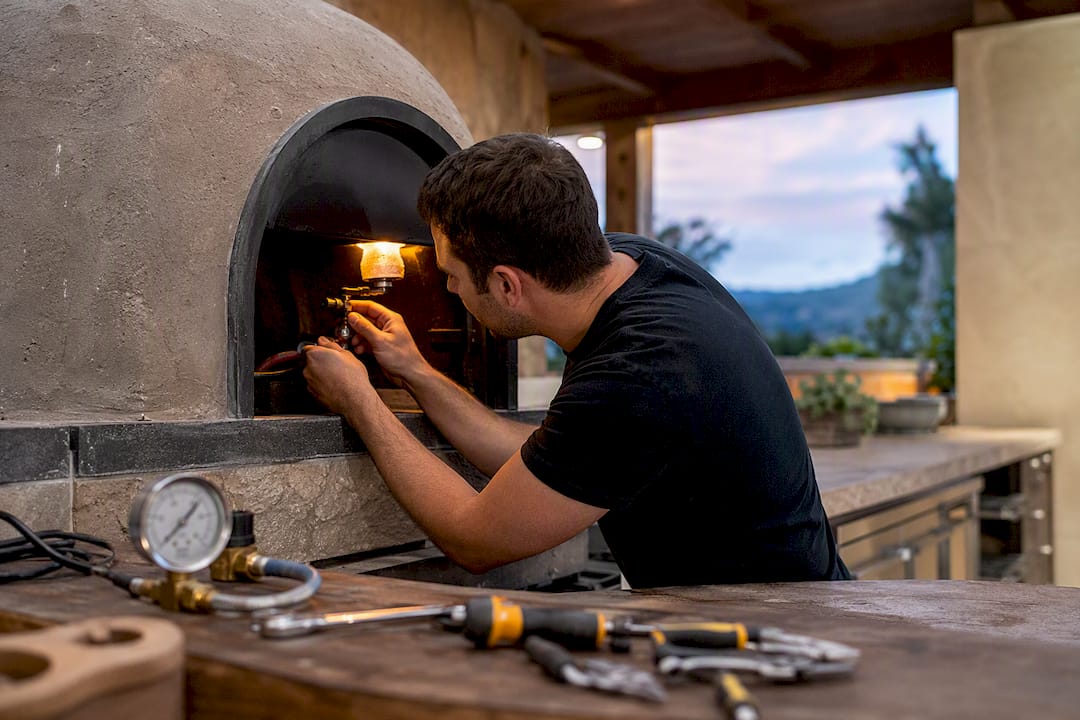
If your pizza oven is acting up, stop and check three things first: power, fuel supply, and any obvious safety signs. Only then move to symptom-specific tests. This is the foundation of proper pizza oven troubleshooting for any commercial unit, gas, electric, or wood-fired.
Certain conditions mean shut down now, no exceptions: a gas smell, a persistent yellow flame, or heavy sooting around the door or flue.
- Power: confirm the outlet, breaker, and any obvious control-panel lights.
- Fuel: check the gas valve is open and the regulator hasn’t tripped.
- Obstructions: look for blocked vents, closed dampers, or error codes.
Pro Tip: Around 20% of conveyor oven service calls trace back to power faults, according to industry repair data — check the plug before you touch anything else. If a propane low-flow trip is suspected, disconnect, wait, reconnect, and open the valve slowly. When in doubt on any gas fault, call an authorised gas fitter.
Key Takeaways
Most commercial pizza oven faults trace back to cheap wear items, supply issues, or a commissioning step that was skipped, not a failed control board.
| Point | Details |
|---|---|
| Stop conditions come first | Shut down immediately for gas smell, persistent yellow flame, or heavy sooting, then call a professional. |
| Follow the diagnostic order | Check heat source, then heat delivery, then controls, to avoid replacing parts that were never faulty. |
| Rule out wear items early | Test gaskets, thermocouples, and springs before suspecting a control board or sensor failure. |
| Track recovery time | Time how long the oven returns to set temperature after load, since slow recovery flags most deck-oven problems. |
| Commission properly from day one | Vesuviano Forni verifies manifold pressure and sensor accuracy with an independent probe during installation to prevent early faults. |
Table of Contents
- Fast safety checks and safe restart for gas and electrical units
- Diagnosing gas-oven faults: ignition, combustion and pressure
- Electric ovens: element banks, contactors and control fault triage
- Wood-fired ovens: firing technique, structural integrity and draft issues
- Conveyor and deck oven mechanical faults: belts, bearings, impingers and stones
- Most frequent faults and the quick fixes you should try first
- Maintenance schedule and spares strategy to reduce unplanned downtime
- Vesuviano Forni on installation and commissioning: Bruno’s practical tips
- Why an oven won’t reach or hold temperature
- What causes an oven to run too hot or overshoot its set temperature?
- Calibrating or replacing faulty thermostats or temperature sensors
- Field-tested triage workflow from the author
- How Vesuviano Forni can help with commissioning, installation and after-sales support
- Sources
Fast safety checks and safe restart for gas and electrical units
Before any deeper pizza oven repair work, run through this sequence in order. It costs you two minutes and it prevents the kind of mistake that costs a burn ward visit.
- Soap-and-water leak test: mix dish soap with water, brush it over fittings and hose connections, and watch for bubbles. If bubbles form, shut the gas off at the source and do not attempt further diagnostics until the fitting is repaired.
- Propane low-flow reset: disconnect the hose from the tank, wait around 30 seconds, reconnect, then open the tank valve slowly, no more than one full turn. Leave the valve at roughly a quarter-open position during normal use, a fix confirmed by Camp Chef’s own troubleshooting guidance.
- Electrical checks: inspect breakers and fuses, look for chafed or scorched cable, and isolate power fully before opening any internal panel.
Pro Tip: Persistent sooting or a sudden change in exhaust smell almost always means a combustion or ventilation problem, not a cosmetic one. Treat it as a stop signal, not an inconvenience.
Diagnosing gas-oven faults: ignition, combustion and pressure
Gas ovens fail in a fairly predictable sequence, and working through it in order saves you from swapping expensive parts that were never the problem. The rule technicians in the field rely on is to isolate the heat source, then heat delivery, then controls, a sequence backed by Berne’s commercial repair field guide.
Start with supply. Confirm the shut-off valve is fully open and, where you have the equipment and training, check manifold pressure against the manufacturer’s rated figure. Low or fluctuating pressure points straight to a regulator or supply-line issue rather than a burner fault.
Next, work through the ignition chain. On pilot-lit units, check the thermocouple or thermopile output; a weak signal here is one of the most common reasons a pilot won’t hold. On spark-ignition models, inspect the igniter tip and flame sensor for carbon build-up or misalignment, both of which cause repeated lockouts that look like a control-board fault but rarely are.
Flame colour tells you a lot. A crisp blue flame means a healthy air-fuel mix. Yellow or lazy orange flames usually mean a blocked orifice or an air-shutter that needs adjusting.
- Clean or replace clogged burner orifices before touching the gas valve.
- Adjust the air shutter in small increments and recheck flame colour each time.
- If manifold pressure is out of spec after these checks, escalate to a licensed gas fitter.
Pro Tip: Many apparent “catastrophic” gas failures are just a fouled thermocouple or a dirty flame sensor, both of which cost a fraction of a control-board swap, as FERMAG’s repair analysis confirms.
Electric ovens: element banks, contactors and control fault triage
Electric units hide their faults well, since a dead zone can look identical whether the cause is an element, a contactor, or the control board itself. Work through the cheap, physical checks before you ever suspect the board.
- Confirm incoming power at the panel, check breaker condition, and inspect wiring for scorching or brittle insulation.
- Test each element bank for continuity and resistance with a multimeter; an open circuit or wildly out-of-spec reading confirms a failed element.
- Inspect contactors for pitting or burn marks. A pitted contactor causes intermittent power to an otherwise healthy element and is often mistaken for element failure.
- Check high-limit and thermal cut-outs. A tripped cut-out that resets and holds points to a temporary overheat event; one that trips repeatedly signals a genuine sensor or airflow fault needing replacement, not just a reset.
- Only suspect the control board once independent probe readings disagree with what the display shows. If the board is logging temperatures the physical probe cannot confirm, that mismatch is your evidence.
Wood-fired ovens: firing technique, structural integrity and draft issues
Wood-fired problems are more often technique or structure than mechanical failure. Before assuming something is broken, look at how the oven is actually being fired.
- Check wood quality and moisture; damp or unseasoned wood is the single biggest cause of low dome temperatures and heavy smoke.
- Review loading pattern and airflow; overpacked fires choke on their own smoke and struggle to build heat.
- Inspect the dome and mortar joints for cracking or water damage, both accelerated by freeze-thaw cycles and poor curing after any prior repair.
- Check the chimney and flue for soot blockages or a stuck damper, which restrict draft and push smoke back into the cooking chamber.
Hairline cracks in the dome plaster are cosmetic, but wide mortar cracks or crumbling brick need a conservation mason, not a service call. Our own guide on firing technique covers loading patterns that prevent most of these issues before they start.
Conveyor and deck oven mechanical faults: belts, bearings, impingers and stones
Mechanical faults on conveyor and deck ovens often masquerade as heating problems, so this is where a lot of parts get replaced unnecessarily.
- Listen and feel around the drive motor and bearings while running. A squeal or grinding noise is an early warning; replacing a bearing before it seizes is far cheaper than replacing a motor after it does, a point Berne’s field guide makes clearly.
- Check impinger fingers for the correct airflow pattern and clean out grease build-up; a weak or uneven pattern often traces back to a failing blower capacitor rather than the fingers themselves.
- Test deck stones by timing recovery after a load. Slow recovery across a stone that’s otherwise intact usually means it has absorbed moisture or lost density and needs replacing.
- Inspect belt tension and sprocket wear; a belt that tracks unevenly or slips under load points to worn sprockets or a stretched belt needing adjustment.
Pro Tip: Recovery time is one of the clearest health indicators a deck oven gives you, Berne notes — time how long it takes to return to set temperature after a busy rush and track it over weeks.
Most frequent faults and the quick fixes you should try first
Most service calls resolve with a handful of low-cost fixes, not a major repair. Work through these before assuming the worst.
- Reset power at the controller and verify the outlet and breaker are delivering full voltage.
- Replace inexpensive wear parts, gaskets, springs, thermocouples, before suspecting a control board.
- Clean burners, orifices, impinger fingers, and vents; grease and carbon build-up quietly rob performance over weeks.
- Adjust conveyor speed or rotate load placement on deck ovens to correct uneven cooking without touching a single component.
Maintenance schedule and spares strategy to reduce unplanned downtime
A disciplined maintenance rhythm prevents most of the faults covered above, and it costs a fraction of an emergency call-out.
- Daily: clear crumbs and debris, run a quick door-seal check, and confirm vents are unobstructed.
- Monthly: inspect springs and gaskets for wear, check burner ports and impinger fingers for build-up, and test blower capacitors.
- Annually: verify manifold pressure, inspect insulation and masonry, and schedule a professional commissioning check.
Keep gaskets, springs, and common sensors in stock. Routine cleaning and proactive gasket or spring replacement head off most temperature-stability and door-seal failures, according to PMQ Pizza’s maintenance guidance.
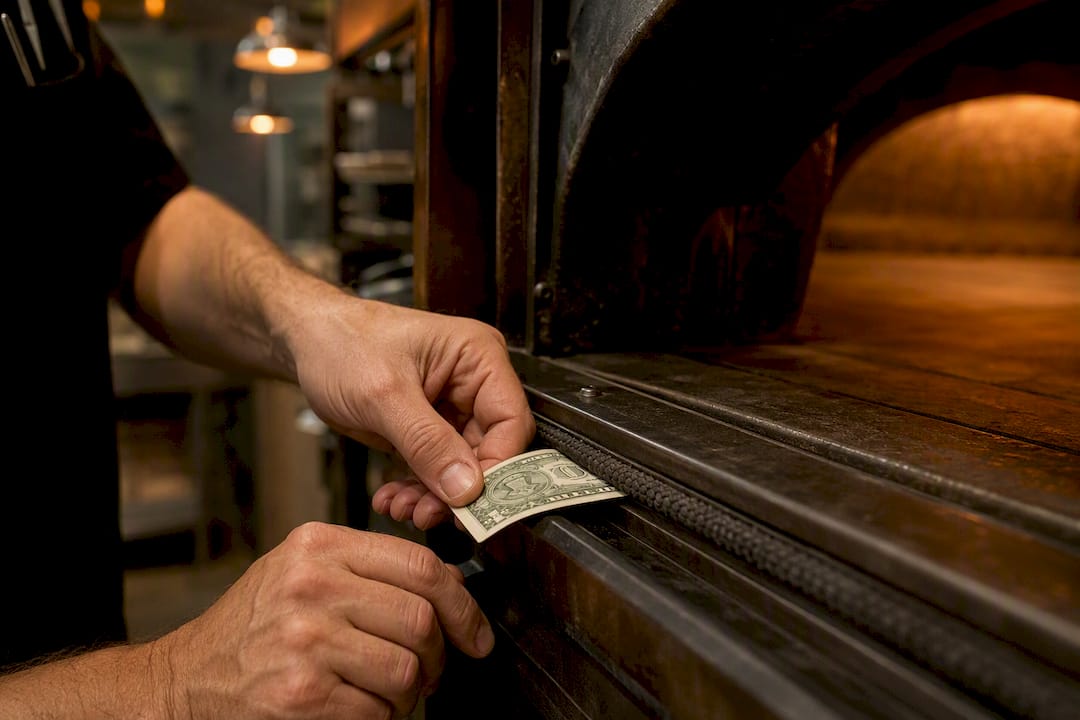
Pro Tip: Run the dollar-bill test monthly: close the door on a dollar bill and pull it out. If it slides free without resistance, your gasket is leaking heat and driving up both recovery time and energy use.
Vesuviano Forni on installation and commissioning: Bruno’s practical tips
Bruno’s field priorities are simple: confirm fuel and power supply first, check door and gasket fit under load, then cross-check every sensor. Correct manifold settings and proper masonry cure time during commissioning prevent the majority of faults reported in an oven’s first year.
Why an oven won’t reach or hold temperature
This is the single most common complaint on deck ovens, according to FERMAG’s repair data, and it rarely has one single cause. Start by measuring actual recovery time with an independent probe rather than trusting the display alone.
On gas units, weak recovery usually traces to low manifold pressure, a partially blocked burner orifice, or a fouled thermocouple that’s causing the flame to cycle lower than it should. On electric ovens, check for a failing element bank or a pitted contactor delivering inconsistent power before assuming the control board is at fault.
Door seals matter more than most operators expect. A gasket that’s lost its compression lets heat bleed out every time the door opens, and on a busy service night that adds up to a stone that never fully recovers. Run the dollar-bill test described earlier; if the bill slides out freely, replace the gasket before touching anything electrical or mechanical.
Insulation degradation is the quiet killer on older units. If manifold pressure, element resistance, and gaskets all check out but recovery is still poor, the refractory insulation behind the stone may have absorbed moisture or broken down. That’s a structural issue, not a parts swap, and it usually needs a technician who can inspect the stone assembly directly. Our guide to expected recovery times by oven type gives you a baseline to compare against.
What causes an oven to run too hot or overshoot its set temperature?
Overshoot is the opposite problem and it’s just as damaging to consistency, since it burns crusts and shortens the life of heating elements and burners alike.
On electric ovens, an overshoot pattern usually points to a failing thermostat or a high-limit cut-out that isn’t tripping when it should. If the display shows the set temperature but an independent probe reads noticeably higher, the sensor itself has drifted and needs recalibration or replacement, not the controller.
On gas ovens, a stuck or oversized burner valve can deliver more gas than the control calls for, pushing the chamber well past target before the thermostat catches up. Check that the valve closes fully at the set point and isn’t held open by a worn spring or debris in the seat.
Thermostat overshoot on any fuel type often comes down to sensor placement. A probe mounted too close to a burner or heating element reads hotter than the actual cooking surface, causing the control to cut power too late. Repositioning the sensor, or replacing it if it has degraded, usually resolves the swing. If overshoot happens consistently and worsens over time, treat it as a calibration issue rather than a one-off fault, and address it before it damages other components through repeated thermal cycling.
Calibrating or replacing faulty thermostats or temperature sensors
A drifting thermostat is one of the most underdiagnosed faults in commercial pizza ovens, mostly because operators trust the display readout without ever checking it against reality.
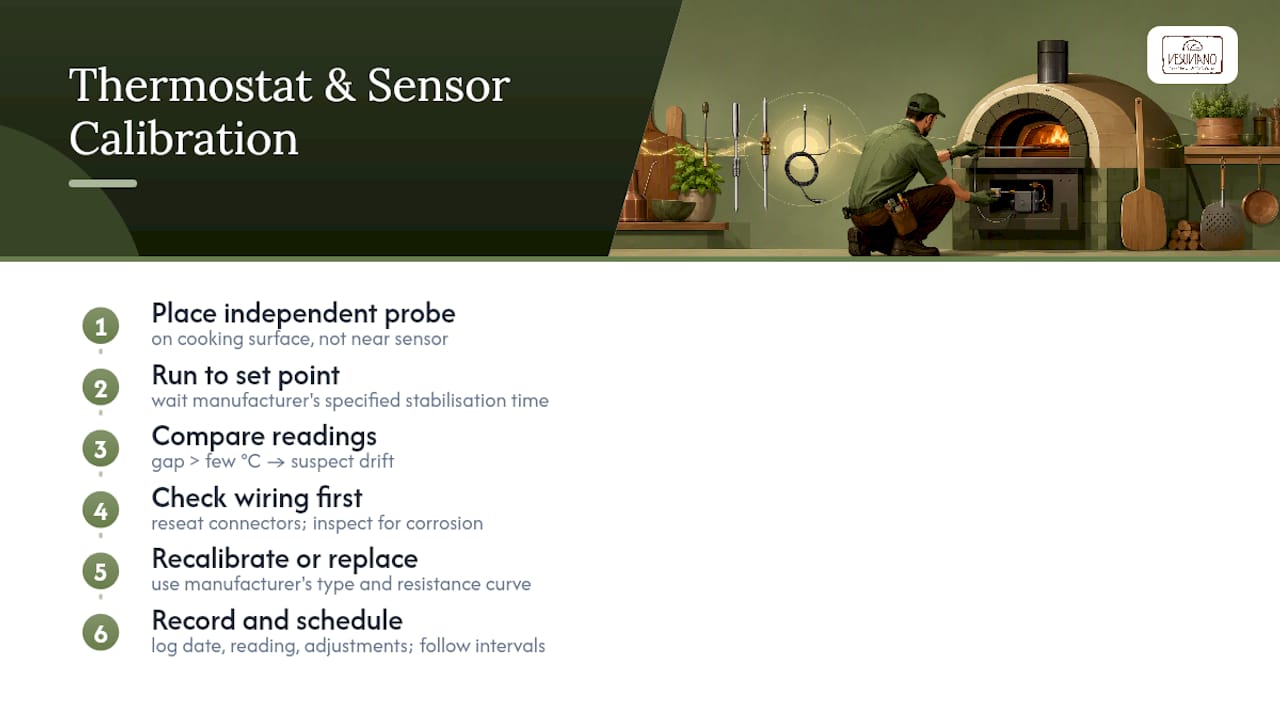
Start every calibration check with an independent probe placed directly on the cooking surface, not near the sensor itself. Run the oven to its usual set point, let it stabilise for the time your manufacturer’s manual specifies, and compare readings. A gap of more than a few degrees on a well-maintained unit usually means the sensor has drifted and needs recalibrating, if the model supports it, or replacing outright.
Before replacing anything, check the wiring and connection points. A loose or corroded sensor lead can produce readings just as unreliable as a genuinely failed sensor, and it costs nothing to reseat a connector before ordering a new part. If the sensor itself is confirmed faulty, always match the replacement to the manufacturer’s specified type and resistance curve; a generic substitute can throw calibration off in ways that are hard to trace later.
Document every calibration check with date, reading, and any adjustment made. This is worth doing on every unit, not just the ones giving trouble, since a small drift caught early prevents the kind of overshoot or undershoot faults covered in the sections above. If your manual specifies periodic calibration intervals, follow them; sensor drift is gradual and easy to miss until a customer complains about an inconsistent bake.
Field-tested triage workflow from the author
The workflow that actually saves time is triage, verify, replace, in that order. Rule out fuel supply and cheap wear items, gaskets, thermocouples, springs, before you ever consider a control board or major component.
Keep the oven running when a fault is cosmetic or minor and shutting down would cost service without adding safety. Shut down immediately for anything involving gas, sooting, or exposed wiring. Shift managers should log every fault with date and symptom; repeated failures at the same point usually mean a maintenance gap, not bad luck.
How Vesuviano Forni can help with commissioning, installation and after-sales support
Most of the faults covered above trace back to one thing: commissioning that skipped a step. A regulator never set to spec, a sensor never cross-checked against an independent probe, insulation given no time to cure properly. Vesuviano Forni builds that verification into every installation, so the oven you’re troubleshooting a year from now starts from a properly calibrated baseline rather than a guess.
Our team handles the full process for restaurants, pizzerias, and hospitality groups: custom design, international logistics, on-site assembly, and commissioning checks that include manifold pressure verification and independent sensor testing before handover. Whether you’re specifying a traditional wood-fired oven with our low-emission system, an electric model for tighter ventilation requirements, or a rotating oven for high-volume service, proper commissioning is what keeps service calls rare instead of routine. Get in touch with our team to request a technical consultation and see which model fits your kitchen.
Sources
For model-specific work, always check the manufacturer’s documentation before improvising a fix.
- Commercial Pizza Oven Repair: Deck & Conveyor Field Guide · Berne
- A look at the top repair issues for pizza ovens · FERMAG
- OUTDOOR oven and outdoor pizza oven not getting hot – Camp Chef